Discover Studios, Services & More Across USA | StudioBDTLA
How to Design a Productive Home Studio

As more professionals shift toward remote work and creative independence in 2025, the demand for high-functioning home studios continues to rise. From photographers and musicians to YouTubers and digital designers, a home studio offers freedom, flexibility, and control over your creative environment. But designing a space that inspires productivity is about more than good gear—it’s about optimizing every element for comfort, focus, and performance.
Table of Contents
Whether you’re building your first setup or upgrading an existing workspace, this guide will walk you through how to design a home studio that keeps your creativity flowing.
Why a Productive Home Studio Matters
A well-designed home studio is more than a convenience—it’s a tool that enhances your workflow. It minimizes distractions, simplifies your process, and allows you to produce professional-quality work without leaving your house.
Creating in a space designed for your needs helps you:
Stay focused and inspired
Work more efficiently
Maintain a professional standard
Improve your content’s quality and consistency
Whether you’re recording music, editing video, hosting virtual meetings, or crafting digital art, your space should work as hard as you do.
Step 1: Define Your Studio’s Purpose
The first and most important step is knowing what your studio is for. Your goals will influence everything from layout to lighting.
Identify Your Creative Focus
Is your main activity photography, video production, music, podcasting, streaming, or digital design? Each type of work requires a different setup.
A photographer may need a large backdrop and lighting rig. A podcaster requires quiet and great acoustics. A digital artist will prioritize desk space, a powerful computer, and visual comfort.
When you know what you’ll be creating, you can design your space with intent rather than guesswork.
Understand Your Workflow
Think about how you move through a project from start to finish. Do you shoot first, then edit? Do you need space to brainstorm or meet with clients? Mapping out your process helps determine how many functional zones you need in your studio.
Step 2: Choose the Right Space in Your Home
You don’t need a massive room, but you do need the right one. Picking the right space helps with both workflow and quality.
What to Look For
Quiet: Choose a room away from street noise, kids, or appliances
Size: You’ll need enough space for gear and movement, but not so big it’s hard to control lighting or sound
Natural light: Ideal for visual work like video or photography
Wall shape and structure: Rectangular rooms with minimal windows and flat walls are easiest to soundproof and furnish
A spare bedroom, attic, basement, or even a sectioned-off corner of a living room can become an effective creative space with the right adjustments.
Step 3: Design the Studio Layout
Layout impacts flow. Organize your studio to reduce setup time and eliminate distractions.
Create Functional Zones
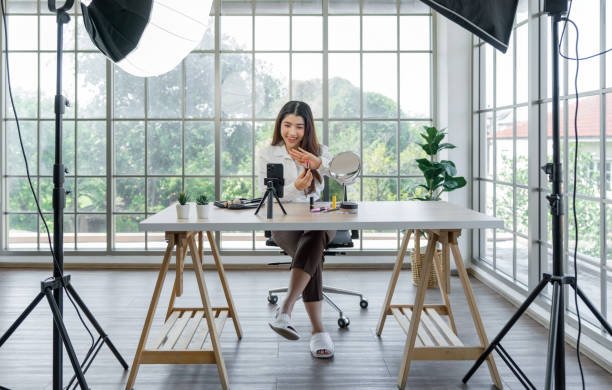
Shooting area: For video or photography work, leave enough space for lights, tripods, and subject movement
Desk area: For editing, writing, or music production, with your monitor and ergonomic chair
Storage: Shelves, bins, and drawers for props, cables, gear, and accessories
Creative zone: Optional lounge, idea wall, or a space for mood boarding and brainstorming
Your layout should support your workflow, not interrupt it. Keep commonly used tools within reach, and leave clear pathways between zones.
Step 4: Choose the Right Equipment
Now that your space and layout are defined, it’s time to gear up. Start with the essentials for your work and upgrade gradually.
For Content Creators and Videographers
Camera: DSLR or mirrorless with 4K video
Lighting: LED panels or softboxes, ring light for talking heads
Tripods and mounts: For camera and lighting stability
Backdrop: Seamless paper or collapsible fabric
Microphone: Lavalier or shotgun mic for clean audio
For Audio and Music Production
Microphone: Condenser mic with a stand and pop filter
Audio interface: For clean recording and multiple inputs
Headphones: Closed-back headphones for isolation
DAW (Digital Audio Workstation): Software like Logic Pro, Ableton, or Audacity
Acoustic treatment: Foam panels, bass traps, and sound diffusers
For Designers and Digital Artists
Computer: High-performance machine with strong GPU and RAM
Monitor: Color-accurate display for editing and design
Graphics tablet: If needed for illustrations or motion graphics
Desk setup: Ergonomic keyboard, mouse, and adjustable chair
Invest in core tools first and expand your gear as your skills and needs evolve.
Step 5: Improve Acoustics
Even if you’re not producing music, a well-treated room makes a huge difference in recording quality and listening comfort.
Easy Ways to Control Sound
Install acoustic foam panels on walls and ceilings
Lay rugs or carpets to absorb sound
Use thick curtains to dampen echoes and reduce outside noise
Add bookshelves or fabric-covered panels for natural diffusion
Seal doors and windows to block external sounds
Poor acoustics can ruin great content. Just a few simple adjustments can elevate your sound to professional standards.
Step 6: Optimize Lighting
Lighting affects both productivity and visual quality. Even if you’re not filming or photographing, good lighting reduces eye strain and sets the tone of your workspace.
Layer Your Lighting
Natural light: Ideal during the day for video calls or creative work
Key light: Your main directional light for photo/video
Fill light: Reduces shadows for a balanced look
Accent lights: Colored LEDs or lamps for mood and atmosphere
Task lighting: Desk lamps or under-shelf lights for focused work
Use dimmers or smart bulbs to control intensity and warmth throughout the day.
Step 7: Prioritize Comfort and Ergonomics
A productive studio keeps you comfortable during long sessions. Don’t sacrifice posture or vision for aesthetics.
Essentials for Ergonomic Design
Adjustable chair with lumbar support
Monitor at eye level to reduce neck strain
Standing desk or riser for flexible work positions
Footrest or balance mat if standing long hours
Anti-glare screen protectors or blue-light filters
Good posture boosts focus, reduces fatigue, and keeps you pain-free during intense creative work.
Step 8: Stay Organized
Clutter kills productivity. A tidy, organized studio makes it easier to focus and find what you need quickly.
Smart Storage Solutions
Label bins and drawers for gear, props, and cables
Use wall-mounted pegboards for tools or headphones
Install shelves above desks for gear or books
Keep a cable management system under your desk
Designate a specific area for charging and prepping gear
Build a system that allows you to reset the room easily after each session.
Step 9: Add Personal Touches
Your home studio should reflect your personality. A little inspiration can go a long way toward boosting creativity.
Creative Decor Ideas
Framed prints of your work or favorite art
Vision board or whiteboard for ideas and goals
Plants or greenery for freshness
LED mood lighting or smart bulbs
Speakers or sound system for background music
These elements make the space enjoyable to spend time in and help you get into a creative mindset.
Step 10: Build Healthy Work Habits
A productive studio is only as good as the habits you build around it. Having the space is half the battle—using it effectively is the other.
Set a Daily Routine
Start work at consistent times
Schedule breaks every 90 minutes
Use task lists or project boards
Minimize distractions (turn off phone alerts)
Keep snacks, coffee, or water within reach
When your studio becomes a space for focus and flow, it transforms from a room into a creative engine.
Let Your Studio Grow With You
As your career evolves, so should your studio. Keep assessing what works and what doesn’t. Maybe you need a second monitor, a better mic, or a new backdrop system. Be flexible and allow your space to shift as your work demands change.
The best home studios aren’t just stylish or packed with gear—they’re thoughtful, functional, and designed around their creator’s needs.
Final Thoughts
Designing a productive home studio is one of the smartest investments you can make in your creative career. It doesn’t need to be perfect from the start—just intentional. Think about your needs, plan your layout, equip it wisely, and build it into a place where great work happens consistently.
Whether you’re recording music, building a YouTube channel, editing client content, or designing digital art, your studio should support you every step of the way.
Need help planning your layout, choosing gear, or optimizing your workflow? Share your goals and space, and I’ll help you turn your vision into a reality.
